How to Add Adsense Above the Post Title in Blogger

Here is a quick tutorial showing you how to add an Adsense block to your blogger blog above the Post title. I have been asked this question frequently as I do this on my main Make Money blog. The reason for doing this is not so obvious - it really comes down to the fact that I have found much higher CTR (click thru rate) with the ads placed above the title rather than the more common position below the title.

The process involves adding "Add a Gadget" boxes to your existing template. Please see How to Add a Page Element (Gadget) to Blogger Header


Rather than re-hashing the steps just follow the instructions in the linked post. This will allow you to add the necessary boxes for adding gadgets above the Post box as well as above the whole main wrapper and the header. See the image above.

Once you have added these boxes you can now add adsense (or anything else you like) above the post title by adding the adsense script in the box above the Post.


I should mention that I never use the Blogger "Add Adsense" gadget. This does not allow you to use channels and is restricting. I always set up my ads in Google Adsense Set Up and then copy/paste the code directly into the "Add a Gadget" box on Blogger. Just select "add HTML/JavaScript" from the options - insert the Adsense code supplied by Google and you are done.

Cheers

Griz

How to Remove the Blogger Navbar

Removing Blogger's Navbar

I have been asked this question a lot. How do you remove the ugly looking Blogger NavBar from the top of the blog?

It is really simple to do - takes less than a minute.

Start your timer and here we go...

Go to Layout and hit the Edit HTML tab

You will see a screen showing the top of your Blogger Template similar to that shown below.

Just add the text exactly as shown in the circle outlined in the screenshot.

Click image to enlarge


And you are done - I told you it was quick!

If you want the NavBar back - just remove the code.

Cheers,

Griz

Update: An even better option.

Denise was kind enough to point me to this post for a better script that allows you to show or hide the bar without having to keep adding or removing the code.

see How to Hide Blogger NavBar

To see how it works just click the "Show/Hide Navigation" link at the top of the sidebar.

How to Add a Favicon to Blogger

Favicons on Blogger

This post will show you how to add a favicon to your Blogger blogs.

What is a favicon?

Let me show you.


A favicon is simply a little mini graphic that appears in the tab box of your browser. Does it help you in regards to SEO? Nope but it does make that ugly Blogger image disappear and gives your blog a little uniqueness.

Adding a favicon is actually really simple and any technically challenged person can do it in a matter of a few minutes.

The first thing you will need is a picture to be used and have it uploaded on your computer. Keep the photo under 1MB in size.

Next go to this site. Free Favicon Generator

You will see the tool shown in the image below. (click all images to enlarge)


Hit the browse button and find the photo you want used stored on your computer.


Once you have selected the desired photo just click the upload button. This will create and store a .ico photo on the server used by the tool. An .ico extension is for windows icon.

You will now see the following screen.


Just cut and paste the code in the lower box into your Blogger Template.

In Blogger;

Go to Layout - Edit HTML - Expand Widget Template - You will see a version of the screen below.


Insert code just above the < /head > tag, click Save Template and you are done. Your photo will now show up in the tab on your browser when your site is loaded.

Cheers

Griz

How to Track your Website Stats

Website Stat Tracking Software - Statcounter.com

How to install Statcounter on Blogger

I use frequent screenshots on my make money online blog and have been asked numerous times how I get the stats that I show.

This is a simple process that involves finding a stat package you like and then inserting the code into your blog. In my case I really like Statcounter.com and recommend that you use their tracking system as well. It is a free package and is easy to use.

Register at Statcounter.com

Once you have registered simply log on and "Add a new Project" under the "My Projects" menu.

Just follow the suggestions in the next screenshot below.

Click image to enlarge.


Hit Next and the following screen should appear if you created your project correctly.


Click the "Configure & Install Code" button.

This page will appear. You can now decide what kind of button you want on your blog or you can choose to make your visit counter invisible. I usually don't show my counter.


If you choose to use an invisible counter then you will skip several of the following steps when you hit the next button. (Go to the step in which you choose your blogging platform below)

If you wish to show your counter on your blog then hit Next and choose between showing "Unique Visits" or "Total Pageloads". Select "Unique" for more accurate stats.


Then choose the type of image you want shown.


Pick the color and font size for the Counter image.


Choose the blog platform you use like "Blogger" or "Wordpress" and you will get a code to install on your blog.


Highlight the code and then cut and paste it into your blog. In my example the code looks like this.


How to Add Statcounter Code to Blogger Blogs

Note: the most recent Blogger update changed the term "Add Page Element" to the current term "Add Gadgets".

Open "Page Elements" in Blogger "Layout".

You will get different stats depending on where you place the code on your page. I have noticed a considerable difference between the number of visitors tracked when the code is at the bottom of the blog. There are always less visitors than when the code is placed on top of the site. For this reason I usually insert the code in the "Add a Gadget" box located above the "Header" Box.

If your template doesn't show this box you can add it by following the step by step instructions here. How to Add Page Elements to Blogger Header (Remember that page elements are now called Gadgets)


Choose HTML/Javascript from the menu inside the Add a Gadget box.


Simply paste the Statcounter code into the content area and click save.


And that is it. You are done.

To see your stats simply log in to statcounter and you will see a list of all the sites you have installed statcounter on. Just pick the site and browse through the various stats offered.


This shows the Summary stats for one of my sites. You can pick various stats from the menu on the left hand column.


Here are the keywords used to find my new make money online blog.


If I click on the keyword link in the stats for "make money with Grizzly" I can see where I rank for the term in the serp's. (Search Engine Results Pages)


And that is how you track the visitors coming to your blog.

Cheers,

Griz

How to Verify your Site to Google

These directions are for people using a self hosted blog or website. These directions are not for those using Blogger blogs but I can do a post about verifying a blogger blog on Google if requested.

A friend is having trouble verifying his wordpress blog and the simplest way to help him is to just show him.

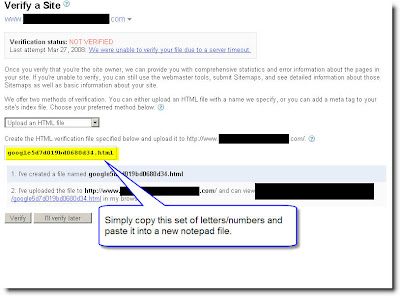
If you have a self hosted site then this is the fastest and easiest method for verifying your ownership to Google. You have two choices for verification; add a Meta Tag to your site or add a html file. Adding the html file is easier as you don't have to understand code - you just have to know how to upload a file.

Example of a Meta Tag


Example of a html file


How to Verify your site using a html file.

Please click images to enlarge and read the directions. Just follow these steps and your site will be verified in a few minutes.


Cheers,

Griz

How to Remove Date and Author on Blogger Posts

Just a quick one here. I get asked this a lot - "How can I get rid of the date on my Blogger posts?" and equally "How can I remove my name from Blogger posts".

Both of these tasks can be done at the same time and is simple to do.


Login to Layout and Page Elements.


The Blog Posts Edit button will bring up the following screen. Just select the items you wish to show on your posts by checking the boxes.


I turned off several items and now the post looks like this...


And that is all there is too it.

Cheers

Griz

Privacy Policy

Update April 2009 - Privacy Policy

This website/blog uses third-party advertising companies to serve ads when visiting this site. These third parties may collect and use information (but not your name, address, email address, or telephone number) about your visits to this and other websites in order to provide advertisements about goods and services of interest to you. If you would like more information about this practice and to know your choices about not having this information used by these companies, you can visit Google's Advertising and Privacy page.

If you wish to opt out of Advertising companies tracking and tailoring advertisements to your surfing patterns you may do so at Network Advertising Initiative.

Google uses the Doubleclick DART cookie to serve ads across it's Adsense network and you can get further information regarding the DART cookie at Doubleclick as well as opt out options at Google's Privacy Center


Privacy


I respect your privacy and I am committed to safeguarding your privacy while online at this site beginner-blogger-basics.blogspot.com The following discloses how I gather and disseminate information for this Blog.


RSS Feeds and Email Updates


If a user wishes to subscribe to my RSS Feeds or Email Updates (powered by Feedburner), I ask for contact information such as name and email address. Users may opt-out of these communications at any time. Your personal information will never be sold or given to a third party. (You will never be spammed by me - ever)


Log Files and Stats


Like most blogging platforms I use log files, in this case Statcounter. This stores information such as internet protocol (IP) addresses, browser type, internet service provider (ISP), referring, exit and visited pages, platform used, date/time stamp, track user’s movement in the whole, and gather broad demographic information for aggregate use. IP addresses etc. are not linked to personally identifiable information.


Cookies


A cookie is a piece of data stored on the user’s computer tied to information about the user. This blog doesn't use cookies. However, some of my business partners use cookies on this site (for example - advertisers). I can't access or control these cookies once the advertisers have set them.


Links


This Blog contains links to other sites. Please be aware that I am not responsible for the privacy practices of these other sites. I suggest my users to be aware of this when they leave this blog and to read the privacy statements of each and every site that collects personally identifiable information. This privacy statement applies solely to information collected by this Blog.


Advertisers


I use outside ad companies to display ads on this blog. These ads may contain cookies and are collected by the advertising companies and I do not have access to this information. I work with the following advertising companies: Google Adsense, ROI Rocket, Project Payday. Please check the advertisers websites for respective privacy policies.


Contact Information


If you have any questions or concerns please contact Grizzly Brears at brears@mts.net. This privacy policy updated March 2008

How to Add a No-Follow Tag to Your Links

Create No-Follow Links, Target Blank Links, Hypertext Links and Quick Links on Blogger

Here is a quick demonstartion of how to add the rel="nofollow" tag to your outbound links. This tag should be added to any links you have on your page that points elsewhere and where you don't want to send any Google juice (pagerank). There are many instances when you don't want to pass Pagerank to other sites; the more links you have passing juice the less authority each link gets. If you assume that you have a total of 1 unit of juice to give and send out 100 links then each link will only have 1/100 of the juice available. If you only send out 1 link then that link will be 100% juice. Keep in mind that the less you link out the better so don't blead excess link juice.

If you are promoting affiliate products (Banners or Text ads) then use the no-follow tag - why give them PR?

If you are selling advertising on your site you must use the no-follow tag - Google does not allow you to sell PR so never put paid links on site without the tag. Google will strip you of your own PR if they catch you selling links without the no-follow attribute.

If you have navigation links to pages like "About", "Contact Us" etc then don't waste juice on these links - use the no-follow.

If you write posts and link elsewhere then decide whether you wish to pass juice on to the sites you link to. Some you will (friends who you wish to help) and some you won't.

How to create a no-follow Link

Here is a standard hypertext link. (Click Image to Enlarge)


and this is what it looks like when the code is added to your blog.

Make Money for Beginners


There are several things we can do to a standard hypertext link;

We can make the Anchor text more useful by changing the keywords to be relevant to the site we are linking to. This is for sending do-follow links to sites that you want to help out. In this case my other site will benefit more if I use "make money online" in the anchor text as that is a term I want to rank well for in the search engines. (Click to Enlarge)


And the result looks like this;

Make Money Online

You will notice that both hypertext links above will take you to the same place - the home page of my MMO blog when clicked. The difference is that Google will count the link as a vote for "make money for beginners" in the first link and count the link as a vote for "make money online" in the second link. Both links pass pagerank to the other blog. The "vote" means that Google will rank me in the serp's (the search engine results pages) for whatever terms are used in the anchor text. I will get ranked for both terms thanks to these two links. The more sites linking to me using these terms the higher I will rank in the serp's. Sites linking to me with higher PR (pagerank) will boost me higher in the rankings.

Now let's say we are promoting a product with an affiliate link. I will use a real example. I am currently promoting a program looking for new publishers in order to give away free magazines among other things. The program will pay me for every free magazine I give away. For the month of July 2008 they will also give $50 to every site that promotes their service. The program is called RevResponse.

In this case I want to link to the site with my affiliate link but I do not want to send them any juice or pagerank.

I do this by adding a no-follow tag to the hypertext link - like so... (Click to Enlarge)


And this is what the link looks like. If you aren't using the Search Status plug in for Firefox then you will see what looks like a normal link - you can't tell if it is a no-follow link or not. If you install the plug in from Search Status then you will see a pink box around all no-follow links.

RevResponse


How to Create a Hypertext Link Quickly on Blogger

1) Highlight the word or words you want in the anchor text.

2) Click the "Link Icon" in the editor.

3) Copy/Paste the url for the site you are linking to in the pop up box that appears.

4) Click OK and the link is created.

5) You will have to do a quick edit on the link if you want it no-followed.

See the screenshots below - click to enlarge.


If you want the hypertext link to open in a new tab then you can add another tag to the link - target="_blank" This is useful if I don't want people leaving my page when they click a link - like the RevResponse link. To do this just add the target="_blank" tag to the code.


Here is the new link to Revresponse - you will find the link above opens in this tab and the link below will open in a new tab.

RevResponse

And that is all there is to creating Hypertext Links.

Cheers,

Griz

How to Add Page Elements to Blogger Header

Adding page Elements to Blogger Blogs

When you create a Blogger Blog the template comes with a pre-defined number of page elements. If you would like to increase the number the following step by step tutorial will show you how. This lesson will deal with adding more Page Elements to the Header section of your Blogger Template.

Update Oct 2008 - Since this post was written Blogger has changed the name "Element" to "Widget". Don't be confused as "widget" is the same thing as "element".

Always download a backup before making changes.

The screenshot below shows a standard Blogger Minima Template.

Click all images to enlarge.


As you can see there is only one element available for the Header section on top.

This is how you can add more.

Under "layout" click "Edit HTML".

Click the "Expand Widget Template" Box.


Scroll down until you come to the section that looks like this;


As you can see the "maxwidget" is set to 1 - this means that there is only one widget (element) available for use in the Header. You can change this to whatever amount you like. I am going to change it to 3.

After making the change be sure to change the "showaddelement" to "yes" so that you will see the option to add another element on the "layout" page.


Click "Save Template" and you are done.

Your "Layout" - "Page Elements" page should now look like this.


And that is how you can add or modify the page elements in Blogger. I will show you how to do this with the other sections in future posts but you may want to try it on your own. The process is the same for all the sections - Main Wrapper, Sidebar Wrapper and Footer.

Cheers,

Griz

How to Change the Width of Blogger Blogs

Modifying the Width of Your Blogger Blog

Here is a quick step by step tutorial on how to change the width of your Blogger Blog.

I have provided screenshots of each step - just follow along and you shouldn't have any problems.

Before you start create a backup of your current blog just in case there is a problem.

I will show you how to change the standard template so that the width is the same as this blog. This basically entails 4 things. First you increase the width of the Outer Wrapper and then you increase the width of the Header and then the two columns inside the outer wrapper. This would be the Post column and then the Sidebar column. Lastly you increase the width of your Footer.

You can click on all images to enlarge them.

Step One

Open "Layout" and choose the "Edit HTML" option.


Note: I am using the Minima Template for this demonstration - if you have a different template just find the appropriate section - the steps are the same.

Step Two


Scroll down to the Header section and change the Header Wrapper width to 820px


Step Three

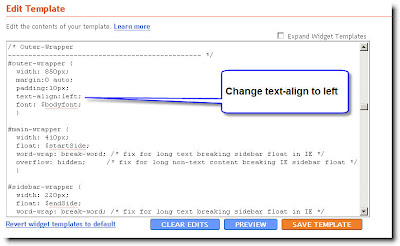
Scroll down to the Outer Wrapper section and change the width to 850px


Step Four

Change the Outer Wrapper "Text-Align" to "left"


Step Five

Change the Main Wrapper width to 550px - this is located right below the Outer Wrapper section. The Main Wrapper is your Post Column.


Step Six

Change the Main Wrapper "float" to "left".


Step Seven

Change the Sidebar Wrapper width to 270px. The Sidebar Wrapper is located right below the Main Wrapper.


Step Eight

Change the Sidebar Wrapper "float" to "right".


Step Nine

Scroll down to the Footer section and change the width to 850px.


Click "Save Template" and you are done.

This is what you have just done;

You widened the size of your usable blog space to 850px. ( The Outer Wrapper )

Inside the Outer Wrapper you have changed the width of the Three Sections that make up your blog.

1) The Header section - 820px

2) The Main Wrapper section which consists of your two columns;

- The Post Column - 550px
- The Sidebar column - 270px

3) The Footer section - 850px

You will notice the Header section is 30px less than the Outer Wrapper.

The two columns add up to 820px - also 30px less than the Outer Wrapper.

I have made the Footer the same size as the Outer Wrapper.

You can play with different widths but be sure that none of the other wrappers add up to more pixels than what you set the Outer Wrapper at. Your two columns should be at least 30px less than the Outer Wrapper so that they have a space between the two columns. The Header should be a little less as you don't want it bleeding right to the edge. (It just looks better) The Footer can be the same width as the Outer Wrapper.

Cheers,

Griz

Project Payday - Work from Home

This program is for those of you who want to make money online but don't have or want a blog or website. This isn't a get rich scheme. It is a work at home job that can make you a few hundred dollars a day if you put in some effort.

I have written several posts about this and suggest you start with this one. Project Payday

Unfortunately Project Payday is only available to American users at this time. It is free to join.